#How to design shirts with cricut for beginners
Explore tagged Tumblr posts
Visit Tumblr Blog
Explore Tumblr blogs with no restrictions, modern design and the best experience.
Last Seen Tumblr Blogs


Fun Fact
28.6 is the average number of monthly visits per US mobile user.
Text
How to Make Custom Shirts with Cricut: A Step-by-Step Guide
I am obsessed with my Cricut machine and create projects on it every day. You can call it my hobby or my big passion for crafting. Recently, I have made dozens of custom shirts with my Cricut Maker machine, and you can create some on your own, too. Following this guide, your guesswork will be reduced to zero, as I will share some of the easiest steps on how to make custom shirts with Cricut.
If you are interested in my tutorial, I would recommend you continue it till the end so as not to miss anything important. I have been creating unique stuff with my Cricut for more than 6 years now; it has been a beautiful journey for me.
Whether you are a beginner or a well-trained Cricut user, this post will help you get some ideas for starting something new. I hope you found this blog helpful and that you will come back for more Cricut-related blogs like this one. Let’s start learning how to design shirts with Cricut for beginners.
Which Is the Best Cricut for Making Shirts?
When you are making a custom shirt, you will have this doubt about which machine to choose. My answer would be to choose anyone you have. Whether you have Cricut Maker, Joy, or Explore, you can choose anyone with your iron-on vinyl to make a perfect custom shirt.
However, you will need to insert the fine point blades to cut this type of vinyl. I hope you got an answer to it. Let’s move forward with this guide on making your custom shirt.
How to Make Custom Shirts with Cricut Machine?
When you are clear about which machine to use and what design you wanna make, let’s get started with my steps. Well, you will need a few things before you move your hands on the desktop. So, gather up all the listed things here.
Cricut Explore Air 2
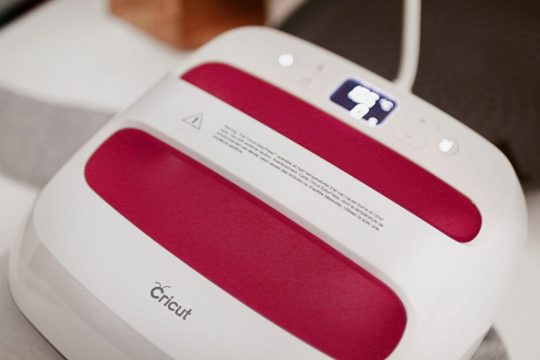
EasyPress 2
EasyPress mat
Shirt apparel
Weeding tool
Brayer tool
Scissors
Standard mat
Premium vinyl
Are you ready with all these? So you’re good to go. When you are ready, head to your Cricut Design Space and show some of your creativity. And follow all the steps carefully.
Step 1: Go to the Cricut Design Space App
In the first step, you should go to your Design Space and pick a design to print on your shirt. As the Cricut app is full of ready-to-make designs, fonts, images, and templates, you won’t have to hustle to make a design. I am using my Explore Air 2 machine; you can use a machine you’re familiar with.
Step 2: Adjust Your Design
Once you are ready with your final design, you can take some time to make that fit for you. For example, you can change the design’s color. On the Design Space canvas, you will get a few options on the right-hand side, from where you can choose your favorite color for the shirt.
Step 3: Change Vinyl Color
Here, you need to change your vinyl color as your shirt’s color may not be a good match with the vinyl’s color. In order to keep the color vibrant and not blend them, you have an option to change the color of your iron-on vinyl. To do this, you should click on the Layers option on the canvas. After that, you can click on the white box with the Layer option and pick a color for your vinyl.
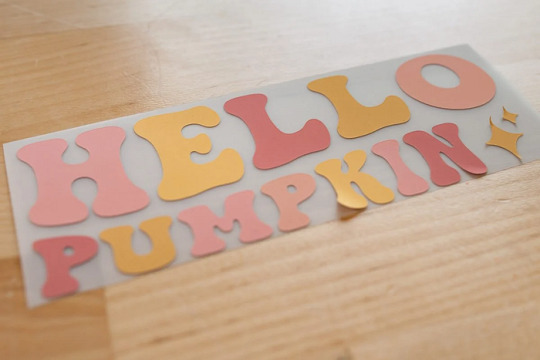
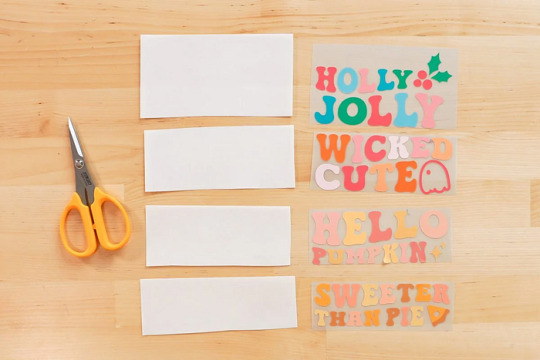
Step 4: Final Your Design
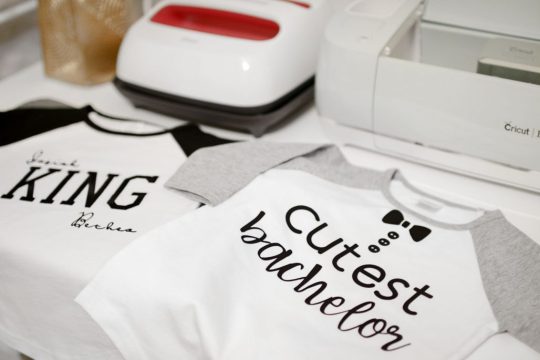
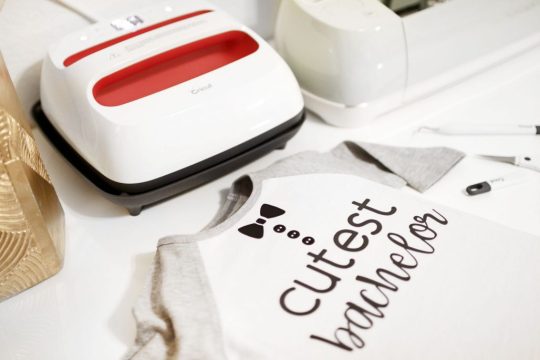
If you find the color combo not as expected, you can change it. Once you have done all the updates, you are ready to save your design. You need to hit the Save button along with the name of your project to remember what this design is about. I am making a design that says “Cutest Bachelor.” Let’s check more steps on how to make custom shirts with Cricut.
Step 5: Load Your Material (Iron-on Vinyl)
In this step, you are ready to cut your project with your special Cricut machine. Don’t forget to load your vinyl on a Cricut cutting mat and then into the Cricut machine. Once you are done, you can start the cutting. Also, select the correct size of your mat on your machine so that your design fits the cutting mat. And the most important thing is to align the iron-on vinyl correctly to get an expected cut.
Step 6: Cut Your Design
When your design is ready, and you have checked all the settings, you can allow your Cricut machine to perform a cut for you. Once you hit the Go button on your machine, it will show you a preview of your final design. If you are satisfied with it, click the Continue button to get a cut. Once the design is fully cut, unload your cutting mat.
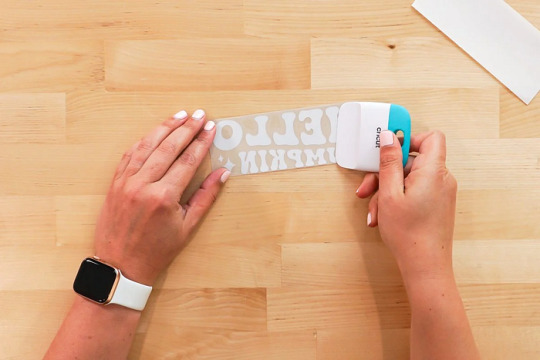
Step 7: Weed Out the Excess Vinyl
When you have a cut in your hand, take a weeding tool and take out excess vinyl to make the design clear and ready to be ironed. You can use your hands too, but a weeding tool is more convenient. Now, you have finally come to the main part of how to make custom shirts with Cricut.
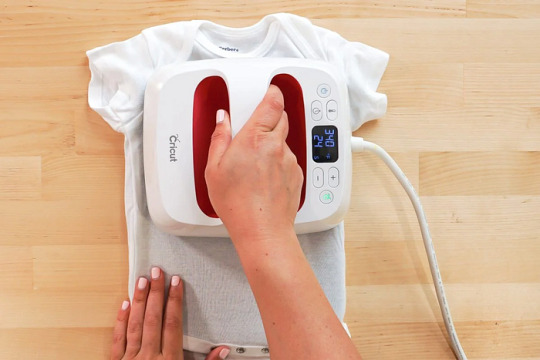
Step 8: Ready Your EasyPress
When your design is ready, you can set your Cricut EasyPress to cotton or linen to get the desired results. So, now you need to put your weeded design on the shirt apparel and use a Cricut EasyPress 2 to heat it. However, before that, you must use a brayer tool to remove lint and fibers from the shirt’s fabric. Once you do that, for the next steps.
Step 9: Preheat Your Shirt
When your apparel is ready, use your EasyPress to preheat it for 15 seconds with moderate pressure to remove the moisture and wrinkling. For the final heating, you should consider a Cricut Heat Guide that will help you find the best setting for your design. After that, use the temperature and pressure accordingly.
Step 10: Apply Heat to Your Shirt
And the last step is to just apply the heat as the Cricut guide suggests. Use a towel to place on your vinyl design, and apply heat for 30 seconds. Using a towel will prevent your iron-on from getting damaged. Viola, you have just designed a perfect custom shirt with your Cricut.
Conclusion
You were all wondering how to make custom shirts with Cricut. And with my blog, you might have found this process a bit easier than before, I guess. Don’t worry; if you follow the instructions carefully, I can bet you can make a fabulous shirt.
However, be mindful of the heating setting as it can ruin your project and waste everything. It’s always better to use a household iron while making your first project. When you get familiar with the process, you can take one step ahead with an EasyPress.
#how to setup cricut maker#How to design shirts with cricut for beginners#Best cricut for making shirts#How to Make Custom Shirts with Cricut
0 notes
Text
How to Use Cricut Maker: Create a Siser Easy Color DTV Project!
Have you just bought a new Cricut Maker and are wondering how to use Cricut Maker? This brilliant Cricut machine may be overwhelming for beginners, but it is simpler than you think. You get many amazing features with this crafting machine. Let’s get ready to use it and make creative DIY projects with it. I will tell you how to prepare a desired project using this Cricut cutting machine.
Cricut Maker offers various adaptive features that help you create unique and beautiful projects effortlessly. Plus, you get a slot for inserting pens and a number of Cricut tools and supplies. It will be all fun to create something with this ultimate machine. Here, I’ll tell you the best methods to prepare personalized apparel using Siser EasyColor DTV. You’ll learn more about it later in this blog. So, let’s get started.
Supplies and Tools You Will Need for Your Cricut Project
Before we get started to learn how to use Cricut Maker, you must gather some important accessories. I’m listing all of the best accessories here. Use them and follow my step-by-step instructions to create your own project. Check the steps below.
● Brand new Cricut Maker or Explore
● Siser EasyColor DTV
● Siser Easy Mask
● An inkjet printer
● Cricut StandardGrip mat
● A weeding tool
● A Cricut EasyPress
● A Cricut scraper tool
Let me tell you what a Siser EasyColor DTV is. It is an iron-on vinyl type that is typically used on lighter blanks such as garments, T-shirts, etc. This unique vinyl is very convenient and useful for creating better designs and sublimation projects. Let’s check the complete method to create the best project.
How to Use Cricut Maker to Make Personalized Apparel?
Finally, we are here to learn the process of creating personalized T-shirts. So, before we move on to the final steps, measure your blank so that you can create an appropriate design. So, let’s check how to use Cricut Maker for beginners.
Step 1: Upload an SVG File to Cricut Design Space
In the first and foremost step, you’ll need to upload your SVG design file to the Cricut software. If you want, you can create a design manually as well. Once you’re ready, just resize your design and make it fit to your blank.
As you’ll have to print this image, ensure that your Cricut machine will recognize it as a printable file and not a file to be cut. To ensure this, choose your image and hit the Flatten option beneath the Layers Panel.
After that, your Cricut machine will show a preview of the image. When you’re ready, just click the Make It button. And now, this design will go through a Print Then Cut feature. To access it, hit the Continue button.
In the next step, you’re allowed to send that image to your inkjet printer and select the paper type you want to print on. I prefer specialty matte. You can select one based on your printer. Get ready with your printer and insert the Siser EasyColor DTV into it.
Step 2: Start Cutting the Siser EasyColor DTV
In the following step, you’ll need to cut your material. On your Cricut machine, select your material as Premium Vinyl Permanent Glossy and set the pressure to More using the drop-down menu.
Next, load your vinyl material on the Cricut mat at the left-side corner and make it stick to the mat using a brayer tool. Now, load the mat with vinyl into the Cricut machine and hit the Play button to allow your Cricut to cut the image. Continue with the steps to learn how to use Cricut Maker.
Once the cut is done, take off the paper sheet from your mat, turn the mat over, and take the mat away from your DTV. Please note that you don’t have to peel off the DTV from the mat. You can also use a pair of scissors to cut the design if necessary.
Step 3: Weed Out the Excess Vinyl
Once you cut your design, you should weed out the excess vinyl from your design. Do this carefully, so that your design doesn’t ruin. This step will add more detail to your project.
Step 4: Cover Your Image With a Mask
Moving forward, cut your mask to the size of your design. Now, take off the transparent film from the mask and then apply the mask alone to your DTV image. Moreover, ensure that the final design is flat and that there are no air gaps between the mask and the design.
Step 5: Transfer Your Design to Apparel

This design is so amazing; I love making it. This is how to use Cricut Maker to reap good results. All the best to all of you who are keen to make something unique and precise.
FAQs
How to Use a Cricut Maker to Make Shirts?
To create a shirt with your Cricut cutting machine, you’ll need to use the Cricut Design Space and a heating press to create a desired design. Get started with the Cricut software, make a design, resize it, and then print and cut it with your Cricut machine. Now, weed away the excess vinyl, and then preheat it with your Cricut heat press, and give a final heat to it.
Which Heat Press Is Suitable for Making an Iron-on Cricut Project?
As there are many options to create an iron-on Cricut project, you can use any of them depending on your requirements. So, the common machines are Cricut EasyPress, Cricut EasyPress 2 & 3, Cricut EasyPress Mini, etc. You can utilize a heat press to transfer the design to your apparel effortlessly.
Can You Use Regular Iron With a Cricut Machine?
Yes, you can. A regular iron is also effective for your minimalist iron-on projects. However, a regular iron may not deliver the results you want and not give a permanent design. Overall, we can say you can use a household iron for normal, sensitive projects but not for complex projects.
Read more: install cricut design space app
cricut.com/setup
cricut.com/setup mac
Source: How to Use Cricut Maker
#How to Use Cricut Maker#How to use cricut maker for beginners#how to use a cricut maker to make shirts#cricut.com/setup mac#cricut explore 3#www.cricut.com setup login#cricut design space#cricut explore air 2#cricut.com/setup#cricut new machine setup#cricut.com setup mac#cricut setup on computer
0 notes
Text
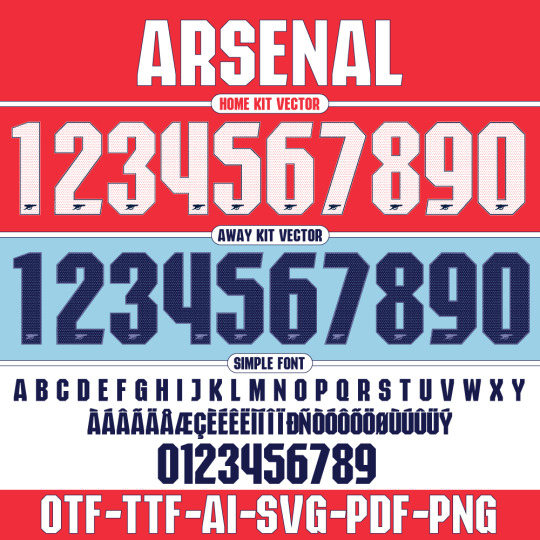
🇲🇽 Mexico 2025 Gold Cup Font – Customize Your Jersey Like El Tri!

Get ready for the 2025 CONCACAF Gold Cup with the official Mexico Jersey Font. You can print your name or honor stars like Lozano, Santi Giménez, or Ochoa. This font pack has everything you need to make your own jersey at home.
👉 Get the Mexico 2025 Gold Cup Font on Etsy Here
🇲🇽 Adidas Mexico 2025 Gold Cup Kit + Font Collection
The Adidas Mexico 2025 Gold Cup Kit was released on March 14, 2025. It debuted in the Concacaf Nations League semi-final against Canada. This kit is a bold design that honors Mexican culture and tradition.

🔥 Design Features:
The kit is black with gold accents, inspired by Mariachi clothing
A special pixelated font mimics Aztec pyramids and architecture
The unique stepped and blocky numbers resemble historic pyramid structures like Teotihuacan and Chichen Itza
Green Trefoil keeper shirt provided by Adidas
A full merchandise collection was released alongside the jersey

This kit combines modern wear with ancient symbols, making it one of Mexico’s most stunning kits.
✍️ What’s Included in the Font Pack
✅ OTF & TTF Font Files (for easy installation)
✅ Perfect for Cricut, Silhouette, etc.)
✅ Numbers 0-9 & Full Alphabet
✅ Pixel-style font inspired by Aztec pyramids
✅ Perfect for fans, creators, and gift-makers
youtube
🖨️ How to Use and Print the Font
Want to customize a jersey with your own name or your favorite player’s number? Here's how:
How to Use the Font:
Download the font from Etsy after purchase
Install the OTF or TTF file on your computer
Use design tools like Canva, Cricut Design Space, or Illustrator
Choose your name + number layout
Print it using DTF paper or HTV (heat transfer vinyl)
Apply the print using a heat press
Done! You’ve created your custom Mexico jersey 🔥
💻 Best 5 Tools for Font Design
Here are our top picks to design with ease:
Canva – Easy-to-use and beginner-friendly
Cricut Design Space – Ideal for precise cutting
Adobe Illustrator – Pro-level vector editing
CorelDRAW – Another great option for advanced designers
Inkscape – Free, open-source alternative to Illustrator

🛍️ Why Buy from Etsy?
Etsy is a secure and trusted platform that supports independent creators. Buying from our official Etsy store guarantees:
Instant download after payment
Secure transactions
High-quality files
Personal use license
Fast customer support from real designers
👉 Get the Mexico 2025 Gold Cup Font on Etsy Here
❓ FAQ – Mexico Gold Cup Jersey Font
Can I use this with Cricut or Silhouette? Yes, the download includes SVG and AI files.
Is this the official font? It’s a fan-made version based on the 2025 Gold Cup jersey design.
Can I print my own name and number? Absolutely! The font is fully editable for any name or number.
Is it for personal or commercial use? This license is for personal use only.
How do I print it on a shirt? Use DTF or HTV paper and a heat press machine.
#Font Football#Font football jersey#Mexico 2025 Gold#Mexico 2025 Gold font#font#font design#fonts#fonts & typography#football#football jerseys#football numbers#jersey#soccer font#Soccer typography#TTF#OTF#script writing#Font script#mexico#Youtube
3 notes
·
View notes
Text
Why Small Businesses in Kuwait Are Turning to Cricut Heat Press Machines in 2025
In recent years, there’s been a clear shift in how small businesses in Kuwait produce custom merchandise. From startup brands in Salmiya to home-based ventures in Hawalli, more people are turning to compact tools like the Cricut heat press machine to bring creative ideas to life. But what’s driving this trend—and why now?
The answer lies in flexibility, affordability, and growing interest in local custom products. According to a report by Statista, the global market for custom t-shirt printing is expected to reach over $7 billion by 2030. Kuwait, with its active small business scene and strong demand for customized gifts and apparel, is steadily catching on.
What is a Cricut Heat Press Machine?
A Cricut heat press is a compact machine designed to apply heat and pressure to transfer vinyl or sublimation prints onto fabric and other materials. Unlike bulky industrial heat presses, Cricut’s models are tailored for small-scale use—making them ideal for home businesses, schools, or designers.
Who Actually Uses It in Kuwait?
Home-Based Entrepreneurs Mothers, students, and side hustlers running online stores through Instagram or TikTok often use Cricut to make customized t-shirts, tote bags, mugs, and phone covers. It’s easy to set up, doesn’t take much space, and works with Cricut’s design software.
Small Garment Brands Fashion startups in Kuwait are using heat press machines to make low-volume, quick-turnaround orders without depending on expensive suppliers.
Printing Shops Smaller print and gift shops across Kuwait are adopting Cricut presses for personalization services, especially for gifts during Eid, graduations, or company giveaways.
Teachers & Schools Some private schools use Cricut machines to create educational visuals, team uniforms, or personalized stationery, which can be made in-house.
Event Planners For events like weddings, birthdays, and corporate functions, Cricut presses help in creating branded merchandise, return gifts, and decorative items.
Why Is It Popular in 2025?
Compact and Affordable: Compared to industrial machines, Cricut presses are small, easy to store, and affordable for startups.
No Technical Training Needed: The learning curve is gentle. Even beginners can get started quickly.
Pairs with DIY Platforms: Platforms like Etsy, Shopify, and Instagram shops work perfectly with Cricut-made products.
Fast Customization: You can personalize orders on-demand, helping avoid inventory waste.
Supports Local Branding: With growing preference for locally-made products, Cricut helps creators in Kuwait meet that demand.
Best Cricut Models for Kuwait-Based Users
Cricut EasyPress 2: Great for beginners making shirts and bags.
Cricut Hat Press: Perfect for cap customization.
Cricut Mug Press: Ideal for mug designs, a top seller during holidays and events.
These are all available through reliable suppliers in Kuwait, including IT Care KW, which also stocks compatible vinyl and transfer sheets.
Wrapping Up: Why It Makes Business Sense
In 2025, Kuwait’s business environment is increasingly supportive of micro-enterprises, creators, and freelance professionals. With tools like the Cricut heat press, individuals have a chance to build income without heavy investment. Whether you're starting from your apartment or looking to scale your branding services, this compact tool lowers the barrier to entry.
It’s not just a hobby machine anymore—it’s a tool that empowers businesses to offer fast, personalized products without depending on high-volume production. And in a market that values unique, high-quality items, that edge matters.
FAQs
Q: Can I use Cricut heat press for professional-level products? Yes. While it’s compact, many businesses use it to produce sellable, high-quality apparel and gifts.
Q: Is it safe for home use? Absolutely. Cricut heat presses are designed with safety features like auto shut-off and even temperature control.
Q: Where can I buy it in Kuwait? You can find Cricut machines and compatible accessories at IT Care KW, a trusted supplier of creative and printing tools.
Q: Do I need a printer or vinyl cutter? Yes, for custom designs you’ll need a vinyl cutter (like Cricut Explore or Maker) and sometimes a sublimation printer depending on the material.
0 notes
Text
Elevate Your Craft Game with the Best Dallas Cowboys SVG Designs

Few NFL teams command the loyalty and passion of fans quite like the Dallas Cowboys. Known as "America’s Team," the Cowboys’ iconic star logo is a symbol of excellence, tradition, and unwavering support. Whether you're a die-hard fan looking to showcase your team spirit or a small business crafting unique merchandise, a Dallas Cowboys SVG file is an essential asset for your creative projects.
In this guide, we’ll explore why Dallas Cowboys SVG files are in high demand, how they can be used in various crafting projects, and where to find high-quality designs. Plus, we’ll show you why SVGBank is the best place to source your Cowboys-themed graphics.
Why Dallas Cowboys SVG Files Are So Popular
1. Iconic Team Branding
The Cowboys' star is one of the most recognizable logos in sports. A Dallas Cowboys SVG file ensures that this legendary symbol retains its clarity and detail, no matter the project size.
2. Perfect for DIY Enthusiasts
From custom T-shirts and mugs to vinyl decals and home décor, SVG files allow fans to personalize their crafts effortlessly. The scalable vector format ensures crisp edges and professional-grade quality.
3. Ideal for Small Businesses
Entrepreneurs creating custom merchandise, stickers, and apparel find SVG files invaluable. With a high-quality Dallas Cowboys SVG, small-batch printing becomes seamless and professional.
4. Flexible & Easy to Use
SVG files are compatible with popular design software and cutting machines like Cricut and Silhouette, making them ideal for both beginners and seasoned designers.
What is an SVG File, and Why is It the Best Choice?
An SVG (Scalable Vector Graphics) file is a high-resolution, editable vector format. Unlike JPEG or PNG images, SVGs can be resized without losing quality. This is perfect for crafting projects that require different dimensions or layering effects.
Key Benefits of SVG Files:
Crisp and clean designs at any size.
Easy to edit in programs like Adobe Illustrator, Inkscape, and Cricut Design Space.
Transparent backgrounds, making them perfect for printing and web use.
Lightweight file sizes for quick processing and smooth cutting.
Best Uses for Dallas Cowboys SVG Files
1. Custom Apparel
Create T-shirts, hoodies, and hats with the Cowboys’ star, helmet, or slogans like How 'Bout Them Cowboys? Using heat transfer vinyl (HTV), fans can design unique game-day gear.
2. Home Décor & Wall Art
Turn your living space into a Cowboys fan zone with framed wall art, pillows, or banners featuring the team’s logo. Stencil designs onto furniture or create large-scale prints with ease.
3. Stickers & Decals
Perfect for car windows, laptops, water bottles, and phone cases, high-quality SVG files ensure that every cut is sharp and professional.
4. Party Invitations & Themed Events
Throwing a Cowboys-themed party? Use SVG files for custom invitations, banners, and cupcake toppers to create the ultimate game-day experience.
5. Laser Engraving & Unique Crafts
Whether it’s engraved wooden plaques, keychains, or metal designs, SVG files retain every intricate detail for one-of-a-kind handcrafted items.
Where to Find the Best Dallas Cowboys SVG Files
When looking for high-quality, well-designed SVG files, not all sources are equal. Free downloads may have low resolution, incomplete paths, or licensing issues. To ensure professional-grade quality and legal safety, choose reputable platforms like SVGBank.
Why Choose SVGBank?
✅ Wide selection of sports-themed SVGs, including Dallas Cowboys SVG files.
✅ High-resolution, layered designs for easy editing and customization.
✅ Instant downloads, so you can start crafting immediately.
✅ Clear usage rights, ensuring legal and hassle-free projects.
➡ Explore the full collection of Dallas Cowboys SVG designs on SVGBank today!
Free vs. Paid Dallas Cowboys SVG Files: What You Need to Know
Free SVG Files:
✔ Pros: No cost, easy access for personal use. ❌ Cons: May have low quality, missing layers, or be unauthorized for commercial use.
Paid SVG Files:
✔ Pros: Higher resolution, layered files, and clear usage rights. ❌ Cons: Small cost, but worth the investment for quality and legal peace of mind.
For guaranteed professional-grade designs, we recommend exploring the premium SVG selection at SVGBank.
How to Use Dallas Cowboys SVG Files with Cricut & Silhouette
Step-by-Step Guide:
Upload your SVG file into Cricut Design Space or Silhouette Studio.
Resize and adjust layers as needed.
Choose your material (vinyl, HTV, cardstock, etc.).
Set the correct cutting settings for clean and precise cuts.
Weed the design carefully to remove excess vinyl.
Apply heat or transfer tape to adhere your design onto the surface.
For troubleshooting:
Ensure the file is fully layered and grouped properly.
Reduce cutting speed for smaller intricate designs.
Get More for Less with a Dallas Cowboys SVG Bundle
Want multiple designs for a discounted price? Opt for a Dallas Cowboys SVG bundle, featuring:
Various star styles and helmet outlines.
Text-based graphics like "Cowboys Nation" or "America’s Team".
Retro & modern logo variations.
Save time and money by grabbing a Dallas Cowboys SVG bundle today!
Final Thoughts & Call to Action
A high-quality Dallas Cowboys SVG is a must-have for fans, crafters, and entrepreneurs looking to showcase their team spirit in creative ways. Whether you’re designing custom apparel, home décor, or stickers, a premium SVG ensures flawless, scalable, and vibrant results.
Ready to start crafting? Check out SVGBank for the best selection of Dallas Cowboys SVG designs today!
👉 Browse Dallas Cowboys SVG files now and unleash your creativity! 🎨🏈
0 notes
Text
Unleash Your Creativity with the Exclusive Jelly Roll SVG
If you're a fan of the iconic rapper turned country sensation, Jelly Roll, and love diving into creative projects, the Jelly Roll SVG is the perfect addition to your design toolkit. This versatile graphic captures the spirit and transformative journey of Jelly Roll, making it ideal for fans who want to merge their love for his music with artistic expression.
What Is the Jelly Roll SVG?
The Jelly Roll SVG is a high-quality digital design inspired by the multi-genre artist Jelly Roll. Whether you're a long-time fan of his rap career or adore his recent foray into country music, this SVG encapsulates his essence, making it a unique choice for various creative projects. The scalable vector graphic ensures clarity and adaptability, no matter the size or platform you choose for your designs.
Why Choose the Jelly Roll SVG?
Here are some compelling reasons why the Jelly Roll SVG is a must-have for your creative projects:
High-Quality Design: This SVG is crafted with precision, ensuring smooth lines and excellent detail for both digital and print applications.
Versatile Applications: Perfect for personalizing t-shirts, mugs, tote bags, posters, and even home decor.
Unique Theme: Celebrate Jelly Roll's musical journey with a design that resonates with his fans.
Easy to Use: Compatible with popular design software like Adobe Illustrator, Cricut Design Space, and Canva, making it beginner-friendly.
Creative Uses for the Jelly Roll SVG
The Jelly Roll SVG is incredibly versatile, making it suitable for a wide range of projects. Here are a few ideas to inspire you:
Custom Apparel: Design a t-shirt or hoodie featuring the Jelly Roll SVG to wear at concerts or showcase your fandom.
DIY Gifts: Create personalized gifts for fellow fans of Jelly Roll. A custom mug or framed print is a thoughtful way to share your admiration for his music.
Event Decorations: Planning a Jelly Roll-themed party? Use this SVG to craft banners, invites, and table decor.
Home Decor: Add a musical touch to your space with wall art or throw pillows showcasing the SVG design.
Why This SVG Stands Out
Unlike generic SVGs, the Jelly Roll SVG is tailor-made for Jelly Roll enthusiasts. It captures his transformative musical journey, resonating with fans who admire his ability to seamlessly blend rap, country, and heartfelt storytelling.
How to Get Your Jelly Roll SVG
Ready to start your creative journey? Access the Jelly Roll SVG on Quick Digital Files, a trusted platform for premium digital designs. With an instant download feature, you can dive into your projects right away.
Final Thoughts
Whether you're a die-hard Jelly Roll fan or someone who loves experimenting with digital designs, the Jelly Roll SVG is a fantastic way to express your creativity. Its versatility, ease of use, and unique theme make it a valuable addition to any designer's collection. Don’t miss the chance to bring your favorite artist’s essence to life through your creations.
Click here to grab your Jelly Roll SVG now!
0 notes
Text
Cricut Joy Xtra: A Versatile and Easy-to-Use Crafting Machine
Are you looking for a crafting machine that is space-friendly? Do you find other tools taking too much of your room space? It’s frustrating! Isn’t it? With Cricut Joy Xtra, you don’t have to worry at all about spaces.
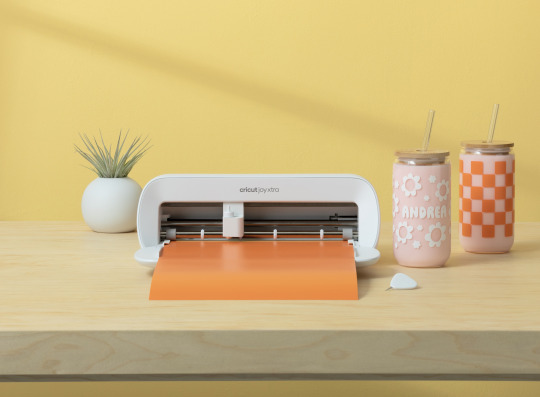
Not only is this wonderful machine small, but it is also highly feasible for small to medium-sized projects. Most importantly, you can create as many crafts as you want. There is no limit to the possibilities. There is something for everyone, be it custom cards, iron-on designs, or stickers. So, let’s start with this machine and see what it entails!
What Can Cricut Joy Xtra Do?
This is an amazing tool for cutting, writing, drawing, and foiling to make popular projects like stickers, custom cards, T-shirts, decals, and more. It is compatible with over 50+ materials, including paper, vinyl, iron-on, and cardstock. One useful plus point for using this machine is that it can sync with your home inkjet printer as well. You can also print and cut designs. With its fine-point blade, it can create intricate designs with almost perfection and precision. In addition, it can write, draw, and foil too.

This tool is also compatible with varying material sizes, like US letter and A4 free. To use the machine, you have to use the Design Space app, which can be connected to it via Bluetooth. You can upload and cut your own designs or choose from the Design Space library.
What Are the Main Features of Cricut Joy Xtra?
The most important aspect of using this machine is that it is beginner-friendly. With the help of the Design Space software, even someone new to Cricut machines can easily create amazing DIY projects. One does not need to be a pro to use this machine.
The app comes with around 3,000 pre-installed “Make It Now” projects. These are in-built projects that are complementary to the software. You will have to connect the machine to your device to use them. First, you need to connect your machine and choose a project. Next, you have to click on “Make It,” and you are good to go. These projects are suitable for various materials and for every skill level, be it a beginner or professional crafter. With the Design Space app and its library of hundreds of fonts, images, and lines, customization isn’t a problem for any art and craft person.
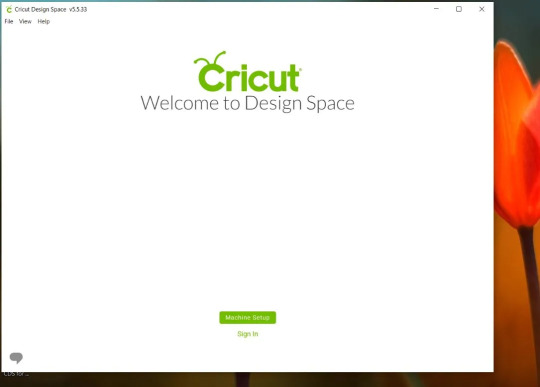
How to Setup Cricut Joy Xtra?
The first step is to download the free Design Space app on your laptop, desktop, tablet, or mobile device. If you don’t already have one, create your Cricut ID.
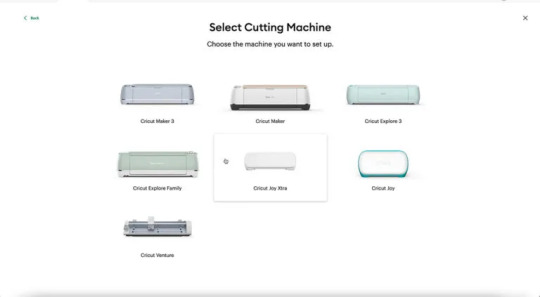
If you already have one, log into your account, select Machine Setup, and tap on your machine model from the list to begin the setup process.
When prompted, connect your device and machine via Bluetooth. The name of the machine can be found on the bottom of your machine.

Your machine will then begin updating before you can use the Cricut Joy Xtra. Ensure that you have at least 30 cm of space behind your machine, as your designs will roll through the back and might get damaged if hindered. So, have an ideal space of at least 30 cm in front and behind the machine.
In the included welcome pack, you will get some practice materials. To use them, follow the steps on your device to carry out your test cut and insert the vinyl into the machine under the two white tabs. Once setup and activation are done, you can perform the on-screen steps to begin cutting. Once the cut is complete, an unload button will appear on your Design Space screen. Tap this button, and the smart vinyl will unload from the machine.
It can also be used to draw and foil. Simply insert the pen or swap over the blade when prompted to do so in the app. It can cut materials up to 21.6 cm wide and 1.2 m long. When using smart materials, the print and cut function can also be used to create stickers for notebooks, jars, tumblers, and more.
Summing Up
With all these major features, crafting is much easier with the Cricut Joy Xtra. It is a perfect tool for beginners who want to venture into DIY projects for mugs, shirts, cards, stickers, etc. It is perfect for every space with cutting compatibility of over 50 different materials, compact design, and lightweight. We hope that reading this blog will help readers to make informed decisions on their buying journey. Enjoy extra with Cricut!
FAQs
What can I do with a Cricut Joy Xtra?
With this machine, one can do many DIY projects. These include stickers, T-shirts, decals, labels, cards, mugs, and even hats! One only needs a compatible device and a high-speed internet connection to get started on this crafting machine.
What are the dimensions of Cricut Joy Xtra?
The machine’s dimensions are (Width x Length x Height) 12.48 in x 4.46 in x 5.87 in (31.71 cm x 11.32 cm x 14.91 cm), and it weighs 6.03 lbs (2.73 kg). Its sleek design makes it the lightest among its competitors, making it comfortable and portable.
Does Cricut Joy Xtra require a PIN code to connect with Bluetooth?
No, you can follow the basic instructions to pair your machine with your Windows/Mac computer or iOS/Android mobile device, and you’re good to go.
Visit here to Know More: Cricut Explore Software
Twitter
Pinterest
0 notes
Text
Let's Celebrate 2023: Cricut New Year's Ideas & Crafts

Explore a festive array of Cricut New Year's ideas for 2023 with our curated collection. Whether you're crafting personalized Cricut New Year's Eve shirts, designing intricate Cricut New Year's cards, or seeking inspiration for memorable décor, we've got you covered. Dive into our assortment of easy-to-follow tutorials and templates perfect for welcoming the New Year with style. From elegant designs to playful motifs, discover how to create custom Cricut projects that capture the spirit of celebration.
Transform your festivities with Cricut's versatile tools and unleash your creativity with our step-by-step guides. Whether you're a seasoned crafter or a beginner, our Cricut New Year's ideas cater to every skill level. Elevate your party décor, surprise loved ones with heartfelt handmade cards, or craft unique apparel that shines during the countdown. Embrace the joy of crafting with Cricut this New Year and make every moment special with our inspiring ideas.
#customnewyearcardsonline#newyearcarddesign#newyearpostcarddesign#2022newyearshirtdesign#2023happynewyearlogo#2023logohappynewyear#2023newyeartshirtdesign#backgrounddesignhappynewyear#bestdesignsfornewyear#bestnewyearcarddesign#carddesignnewyear#designfor2022newyear#designhappynewyearcard#digitalnewyearcarddesigning#greetingcarddesignnewyear2023#happynewyear2021design#happynewyear2022carddesign#happynewyear2022logodesign#happynewyear2022posterdesign#happynewyear2023circledesign#happynewyear2023designfortshirt#happynewyear2023designtshirt#happynewyear2023frontdesign#happynewyear2023posterdesign#happynewyear2023tshirtdesign#happynewyearbestdesign#happynewyearflyerdesign#happynewyearlatestdesign#happynewyearmugdesign#happynewyearposterdesign
0 notes
Text
8 Incredible Beginner Cricut Projects for New Crafters
Hey there! Are you in search of beginner Cricut projects? There was a time when I was at your place😁, looking for the answer to the same questions. Then, I hardly used to get an easy design I could start with. So, I used to get references from the blog but never copied the same. Using the Cricut Design Space app, I made some simple designs by adding my creative touch.
One of the biggest takeaways from creating these easier designs was that I learned almost all the features of the Cricut app, like which tools are used for what purpose. This gave me confidence and made me an expert in crafting. Today, you will explore the top 8 Cricut projects for beginners. So, what are you waiting for? Let’s get started without any further delay!
Heart Print Hoodie

I recently came up with an interesting idea: I would create a T-shirt with geometric graphics. Yes, adding a simple kind of design is boring now! So, I first found the design on the internet and did some modifications to it. Yes, modifications like resize and color are needed depending on your choice of color and the size of the T-shirt you are going to work on. Rest, Cricut has your back, and this is going to be one of the best beginner Cricut projects!
Phone Case

I love personalized phone cases. Besides, I also prefer some kind of unique pattern. If you love personalized phone cases, you can do so with Cricut. Yes, the Cricut machine can help you create or cut vinyl designs that you can place on your phone case. It will literally look great when you use your own handmade design on the case. Must give it a shot!
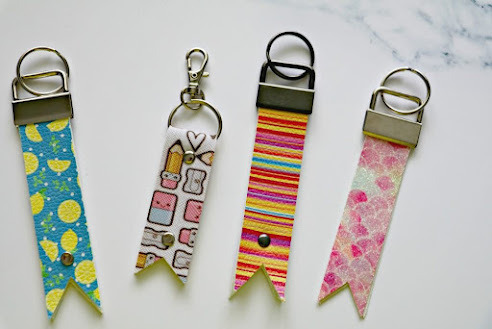
Leather Keychains

If you want something like beginner Cricut projects, you have an endless option for easy projects you can create even if you just got your new Cricut for the first time. Yes, Cricut has designed its machine and software to be easy to use so everyone can use them hassle-free. Now, you need to simply cut the leather into simple strips and add the text or anything that you want.
Paper Card

Want to make your loved one feel special? Try making this simple card that says everything that you want to say. I really love the font style that I selected for the word LOVE. Just imagine if you write your loved one’s name in contrast. Isn’t that going to impress your partner? Now, use Cricut to make your love life more robust than before.
Wooden Sign

Want to make your home more welcoming? Try this wooden home sign. Don’t worry about the material; Cricut can cut and engrave wood without hassle. All you need to do is get ready with your text design on your Cricut Design app. Modify according to the size of the blank that you have chosen. Once done, you can get started with your beginner Cricut projects in one go!
Pillow Cover
Why not create a pillow with a catchy quote? That one is my favorite: HOME IS WHEREVER I’M WITH YOU. It sounds romantic, doesn’t it? Add such a quote and select any font that you like. Cricut Design Space can offer you many such fonts without any issues. So, what’s the issue — you are not required to waste hours creating those intricate designs. Just type, and you are done! 😃
Jar Labels
If you are looking for easy-to-make beginner Cricut projects, try jar labels. Yes, that can be one of the easiest and most valuable projects. I made this for my kitchen jar as I was finding it difficult to figure out the whereabouts of the ingredients. Also, I created this using a simple paper, and you know how to create texts — it’s your Cricut Design Space. This software has an intuitive interface, making it user-friendly. So what are you waiting for? Get started today!
Custom Water Bottle

I love Customized bottles. Do you? If so, you should give it a try once! These types of beginner Cricut projects are always at the top of the list. If you want to work on Cricut projects for beginners, consider this. I used vinyl materials and worked on the design myself. Anyone interested in creating such a design can take a reference and try it once!
FAQs
Question 1: How to make a DIY home sign using Cricut?
Answer: In order to make your DIY home sign using Cricut, you have to follow the steps described below:
Gather your important supplies.
Create a design or add text you like.
Choose the material and place it on a cutting mat.
Cut the design using your Cricut cutting machine.
Weed out the design.
Transfer the design to your blank.
Question 2: What supplies do I need to make beginner Cricut projects?
Answer: It generally depends on what sorts of projects you are working on. However, I can tell you about some standard supplies used for almost every type of project. To know what those supplies are, have a look at the list below:
Cricut cutting machine
Cricut mat
Cricut basic tool set
Scissors
Cricut software installed on your device
Question 3: What to use for making a personalized water bottle with Cricut?
Answer: Creating a personalized water bottle with Cricut is always fun. However, you will need the following items in order to create a customized water bottle:
Cricut smart cutting machine
Cricut Scraper
Cricut Smart Vinyl Permanent (Choose colors like Purple & Champagne)
Hand towel
Cutting mat
Cricut Weeding Tool
Cricut Transfer Tape
Water bottle (Black)
Scissors
Question 3: Which Cricut machine is the best for beginner crafters?
Answer: Cricut Explore 3 is your answer! Yes, you heard that right. This machine is a mid-range model available in Cricut’s lineup. Anyone who is a beginner can start with Cricut Explore 3, as it is the latest in the Explore family and offers almost all the features that beginner crafters need in their projects.
Source: beginner Cricut projects
Visit here For More Information: Cricut.com/setup
Twitter
0 notes
Text
8 Easy Cricut Project Ideas for Beginners to Try in 2024
Hey, dear crafters! Are you looking for Cricut project ideas for beginners? If so, you are in the right place! Do you know how fun it is when it comes to creating DIY projects? You won’t believe I enjoy it a lot. This is the best part of my life, and I enjoy crafting as my hobby. It feels really great when you finally transform your hobbies into passion and then further into a profession.
As a craft seller, I create and sell many projects on e-commerce sites like Etsy, Amazon, and many others. If you are a beginner and don’t know where to start, chillax! In this blog, I have covered the 8 best handmade projects with your Cricut machine that every crafter, including beginners, can create in one go! Let’s dive into it!
Personalized T-shirt
If you are looking for some personalized-based Cricut project ideas for beginners, this will be a great project to make. As a beginner, it is perfect for you! Not only can you add a text design, but it is also superbly easy to make.
Moreover, you will end up making something that lasts longer than you think! So, all you need is a blank T-shirt of any color you like, and start working on it! Add your favorite quotes or slogans to your T-shirt. Customize your first T-shirt the way you want!
Tea Towel
If you want to add more to your home decor, you will want this custom tea towel. It is decorated using an Iron-On material, which is undoubtedly perfect for novice crafters. You will need simple cut clothes.
Mug
Here is another gift idea suitable for every beginner looking for the easiest Cricut projects for beginners. Whether you want to gift your loved ones or yourself, this is the best project you can try on Cricut.
Although you will need a Cricut Mug Press, the project is easier to make. Just personalize it for anyone you want to give it to. I am pretty sure about this idea because it is going to be everyone’s favorite.
Labels
Today, it has become a trend to label everything. Labeling has its own benefits. I have almost labeled every box and canister in my kitchen. It helps me use the same box for different items, and it is easier to find things.
Advertisement
Whether you want to keep your coffee and flour, label them and see how quickly you will find it next time. Apart from these, this is one of the best Cricut project ideas for beginners because you only need to add text for the labels.
Notebook
Why don’t you add something to your stationery now? With your first-hand experience, create something amazing on Cricut and gift it to anyone, whether they are kids or adults. It can be a great gift idea and very useful.
On the notebook’s cover, I added the text “You are loved.” You can try a plethora of things or motivational quotes that keep you inspired all the time.
Gift Tags
Gift packaging is incomplete without gift tags. Don’t worry; I have some of the best Cricut project ideas for beginners. Yes, these ideas can elevate your gift packaging to a great extent. As you can see in the picture above, I created it using paper and saw how beautiful it looks. Gift tags are also a great way to start with your Cricut if you are a novice crafter and want to create something easy.
Paper Flower
Want to make something beautiful using paper? Look no further and grab this idea! It might seem trickier, but it is not. I used a bunch of cardstock paper and cut the pattern accordingly on my Cricut machine. Yes, I had to work on my design a little bit on Cricut Design Space. However, you can also get SVG files online if you do a little research.
Phone Case
Do you know the best thing about Cricut is that it can solve all your crafting problems? Well, the problem is the wrong word. I think I should say it is a stop-complete solution provider that meets all the demands of crafters. Thanks to Cricut, I added a beautiful pattern to my phone cover. For this, I simply used adhesive vinyl. So, these are the best Cricut projects for beginners. You must give it a shot!
FAQs
Question 1: What are the best-selling Cricut project ideas?
Answer: The numbers are endless if you are looking for the best-selling crafting ideas you can make on Cricut. Be it Cricut Maker or Explore model, you can easily create these projects in no time.
Sticker
Wall Decals
Coffee Mug
Signs Boards
Personalized Shirts
Apparel
Jewelry
Coasters
Door Mat
Tote Bag
Question 2: Is coaster the best Cricut project idea for beginners?
Answer: Yes, it can be superbly exciting as well. An easy-to-make coaster will consume less time than other projects. In addition, coasters are usually smaller in size. Therefore, they can be created easily in no time. So, beginner crafters who are looking for something easy can give it a shot.
Question 3: What do I need to make Cricut projects?
Answer: Different Cricut projects require different types of supplies or accessories. However, there are common supplies that you may need in every Cricut project. They are as follows:
Cricut basic tool set
Cricut cutting machine
Cutting mat
A computer (Windows or Mac) and mobile device (Android or iOS)
Bluetooth connection or USB cord
Source :- https://cricutsetupprocess.wordpress.com/2024/05/07/8-easy-cricut-project-ideas-for-beginners-to-try-in-2024/
cricut new machine setup
0 notes
Text
How to Use Cricut Infusible Ink: A Comprehensive Guide
Eager to learn about infusible ink and create a project with it? Here, you’ll get it all in detail. I’ve been using Cricut machines for the last five years, and there is nothing left that I haven’t used to date. I also started as a beginner, but soon, I experimented with many Cricut accessories. Today, you’ll learn how to use Cricut infusible ink to make a personalized T-shirt. You’ll get a step-by-step guide to learning how to use infusible ink.
Before I move on to the final steps, I would like to share with you something that you need to know about Cricut infusible ink, like what it is, how it works, and how you can best utilize it to create your projects. Let’s get started!
What You Need to Know about Cricut Infusible Ink?
I know creating a new project seems exciting, but at the same time, the chances of silly mistakes increase, too. It’s always better to learn before you start. Infusible ink is a different type of ink used for creating professional-looking projects using a range of materials. You might have used iron-on vinyl or HTV, which are usually applied over the surface or your material and then peeled off, leaving the design.
However, there is a different case with infusible ink. This ink works on the sublimation principle and fuses with your material without leaving any residue. Thus, it gives you a typical printing look but with ink. To make an infusible ink project, you’ll need to use infusible ink sheets and infusible ink pens.
How to Use Cricut Infusible Ink to Make a Shirt?
You know what infusible ink is and how it works. It’s way better than the vinyl projects and leaves a permanent design on your material. Get ready to learn how to use infusible ink transfer sheets on shirts and create customized T-shirts.
Step 1: Select an Infusible Ink Material and Apparel
You have two options: Either you can cut your designs onto an infusible ink transfer sheet or draw the designs using your infusible ink pens and markers. In this guide, you’ll learn to cut and apply your infusible ink transfer materials to your final project. Note that I’m not teaching you how to use the infusible ink and markers here. So, if your main focus is on them, I’ll recommend you move on to another tutorial. Here, we go with the other steps to learn how to use Cricut infusible ink.
Step 2: Draw a Design in Cricut Design Space
This step includes making a desirable design using special software from Cricut. I’m mentioning a few steps here that you can go through to understand how you can use this software.
Step 3: Cut Your Infusible Ink Transfer Sheets
It’s time to use an infusible ink transfer sheet to cut it. To proceed, use these steps:
That’s how you’ll finish the cutting process. Let’s continue learning how to use Cricut infusible ink transfer sheets.
Step 4: Get Ready With Your Materials
In this step, you’ll have to use a Cricut EasyPress to transfer the design onto your shirt. Follow the steps below to learn how to apply the transfer sheet.
Step 5: Preheat Your Blank
The first step to transfer your project to your blank is to preheat it as per the instructions in the Cricut Heat Guide. This process will remove the wrinkles and moisture from the blank and won’t interfere with the design transfer.
After that, take off your heat press from the apparel and also remove the butcher paper. Allow your blank to cool. Don’t be in a rush, and let your blank space fully cool down.
Step 6: Transfer the Infusible Ink
In this step, you need to put your cut design on the apparel. Make sure that the shiny side is facing down. Then, follow the steps mentioned here.
Finally, your customized shirt is ready. One more thing I want to suggest to you is that you can also use a pair of tweezers to lift the transfer sheet from your apparel. It will safely remove the material.
Conclusion
Hopefully, you’ve learned how to use Cricut infusible ink to create a customized shirt. The whole process is easy, and even beginners can perform it very well. Moreover, there are some tips and tricks that are useful while creating your project with the Cricut machine. For instance, always remember to mirror your design. Plus, always preheat your blank before applying the heat properly. The most important part is not to forget to weed off your cut design before using it for the final project.
Visit: install cricut design space app www.cricut.com setup login cricut create connect to computer cricut setup create account
Source: https://desincricut.wordpress.com/2024/04/30/how-to-use-cricut-infusible-ink-a-comprehensive-guide/
#install cricut design space#install cricut design space app#install cricut explore air 2#cricut install setup#cricut.com/setup#www.cricut.com setup login#cricut setup create account#cricut create connect to computer#cricut setup on computer#cricut setup#cricut setup maker#cricut setup log in#cricut.com setup mac
0 notes
Text
7 Cricut Machine Projects: Get Inspired & Start Crafting
I know you are looking for Cricut machine projects, and you have landed in the right place. I'm excited to share some unique project ideas you must try. Each idea is created for beginners, keeping it simple, fun as well as inspiration.
In this guide, I won't bore you with unnecessary details. Instead, I will mention the crafting tools needed for each project & their main purpose and sometimes guide you on how to use them. You don't have to tackle anything complicated; just follow the ideas outlined in the blog. Regardless of your Cricut machine, I have covered all the projects you can create. Let's dive into our first project.
1. Customize Candle Jar
I love decorating my room, and I'm sure you do too. For cozy night time vibes, candles are a must. Why not customize your own candle jar with your Cricut machine? All you need is colored vinyl, a weeding tool, a clean jar, transfer tape, and of course, your Cricut cutting machine. Design in the Cricut software, cut, and apply to the jar!
2. Leather Keychains
Keychains are often overlooked, but they are a great way to add personality to your daily items. I make keychains for my car, room, and locker, and people notice! If you are exploring Cricut machine projects, try creating faux leather keychains. You will need a Cricut machine, faux leather, iron-on vinyl, a Cricut Heat Press, and Design Space to get started.
3. Banners
Recently, I celebrated my daughter's birthday. I handled all the decorations with my Cricut machine. One Cricut machine project that stood out was creating a birthday banner. Planning a party becomes more enjoyable with Cricut crafts. With a Cricut cutting machine, cardstock, weeding tools, and designs from the Cricut app, you're all set!
4. Labels
Let's move on to other Cricut machine projects. Turn on your Cricut machine and start cutting out personalized text for your pantry items. You can also add designs with text on chalkboard vinyl if you want. This project will undoubtedly prove to be very useful as it allows you to easily label and identify your items.
5. Decals
If scratches on your laptop are causing trouble, it's time to solve this common issue. Create a custom design with Cricut software, cut it onto printable vinyl in your preferred color, and apply it to your laptop. This DIY solution is not only cost-effective but also allows you to personalize your device exactly how you want it.

6. T-shirts
I can't overlook the excitement of t-shirt projects with a Cricut machine. It's not just any DIY project; it's an adventure filled with fun. For this, you will need a Cricut cutting machine and a Cricut Heat Press. Once you learn to make T-shirts with Cricut, you'll feel confident with iron-on and infusible ink projects, too.
7. Mug & Tumblers
Well, who doesn't love personalized tumblers or mugs? They add such an attractive and personal touch. The good news is you can make them yourself with the help of a Cricut Mug Press and a Cricut cutting machine. Simply cut the infusible ink and press it into the tumbler or mug using the Mug Press machine.
Final Thoughts
Whether it's the weekend or just a casual occasion, crafting with a Cricut machine is always a lot of fun, isn't it? However, sometimes, finding the right Cricut machine projects can be overwhelming. To address this, I have mentioned 7 creative and unique projects in the blog above, ranging from candle jars to t-shirts and banners. Once you have completed these DIY projects, you will be even more enthusiastic about Cricut crafting.
Frequently Asked Questions
How to get a free Cricut project?
The best and easiest way to make crafts with Cricut is by finding and creating your desired project for free.
First, open the Cricut app and select New Project.
Next, navigate to the design panel and choose images.
Click on Free under the highlighted categories and type in your desired project.
What is the easiest thing to make with a Cricut?
If you are a beginner in Cricut crafting, here are some easy Cricut machine projects you can start with.
Flowers
Shirt
Gift tags
Decals
Tumblers
Mugs
Stickers
Keychains
What can a Cricut machine do?
A Cricut machine is an electronic cutting machine that can cut symbols, designs, and images on a variety of materials with precision. In addition to cutting, the Cricut machine can also write, deboss, foil, and engrave with a variety of tools and blades. Some Cricut machines also have a print-then-cut sensor so you can cut out the printed design.
Source Url :- Cricut machine projects
Visit here for more Information :- cricut design space
Cricut cutting machine
#Cricut machine projects#cricut.com/setup#design.cricut.com/setup#cricut.com#cricut design space#cricut design space download#cricut design space login#design.cricut.com/setup explore air 2#cricut.com/setup maker 3#cricut.com/setup app#cricut.com/create#cricut.com/register
0 notes
Text
How to Make Custom Shirts With Cricut: A Step-by-Step Guide
I am obsessed with my Cricut machine and create projects on it every day. You can call it my hobby or my big passion for crafting. Recently, I have made dozens of custom shirts with my Cricut Maker machine, and you can create some on your own, too. Following this guide, your guesswork will be reduced to zero, as I will share some of the easiest steps on how to make custom shirts with Cricut.
If you are interested in my tutorial, I would recommend you continue it till the end so as not to miss anything important. I have been creating unique stuff with my Cricut for more than 6 years now; it has been a beautiful journey for me.
Whether you are a beginner or a well-trained Cricut user, this post will help you get some ideas for starting something new. I hope you found this blog helpful and that you will come back for more Cricut-related blogs like this one. Let’s start learning how to design shirts with Cricut for beginners.
Which Is the Best Cricut for Making Shirts?
When you are making a custom shirt, you will have this doubt about which machine to choose. My answer would be to choose anyone you have. Whether you have Cricut Maker, Joy, or Explore, you can choose anyone with your iron-on vinyl to make a perfect custom shirt.
However, you will need to insert the fine point blades to cut this type of vinyl. I hope you got an answer to it. Let’s move forward with this guide on making your custom shirt.
How to Make Custom Shirts With Cricut Machine?
When you are clear about which machine to use and what design you wanna make, let’s get started with my steps. Well, you will need a few things before you move your hands on the desktop. So, gather up all the listed things here.
Cricut Explore Air 2
EasyPress 2
EasyPress mat
Shirt apparel
Weeding tool
Brayer tool
Scissors
Standard mat
Premium vinyl
Are you ready with all these? So you’re good to go. When you are ready, head to your Cricut Design Space and show some of your creativity. And follow all the steps carefully.
Step 1: Go to the Cricut Design Space App
In the first step, you should go to your Design Space and pick a design to print on your shirt. As the Cricut app is full of ready-to-make designs, fonts, images, and templates, you won’t have to hustle to make a design. I am using my Explore Air 2 machine; you can use a machine you’re familiar with.
Step 2: Adjust Your Design
Once you are ready with your final design, you can take some time to make that fit for you. For example, you can change the design’s color. On the Cricut Design Space canvas, you will get a few options on the right-hand side, from where you can choose your favorite color for the shirt.
Step 3: Change Vinyl Color
Here, you need to change your vinyl color as your shirt’s color may not be a good match with the vinyl’s color. In order to keep the color vibrant and not blend them, you have an option to change the color of your iron-on vinyl. To do this, you should click on the Layers option on the canvas. After that, you can click on the white box with the Layer option and pick a color for your vinyl.
Step 4: Final Your Design
If you find the color combo not as expected, you can change it. Once you have done all the updates, you are ready to save your design. You need to hit the Save button along with the name of your project to remember what this design is about. I am making a design that says “Cutest Bachelor.” Let’s check more steps on how to make custom shirts with Cricut.
Step 5: Load Your Material (Iron-on Vinyl)
In this step, you are ready to cut your project with your special Cricut machine. Don’t forget to load your vinyl on a Cricut cutting mat and then into the Cricut machine. Once you are done, you can start the cutting. Also, select the correct size of your mat on your machine so that your design fits the cutting mat. And the most important thing is to align the iron-on vinyl correctly to get an expected cut.
Step 6: Cut Your Design
When your design is ready, and you have checked all the settings, you can allow your Cricut machine to perform a cut for you. Once you hit the Go button on your machine, it will show you a preview of your final design. If you are satisfied with it, click the Continue button to get a cut. Once the design is fully cut, unload your cutting mat.
Step 7: Weed Out the Excess Vinyl
When you have a cut in your hand, take a weeding tool and take out excess vinyl to make the design clear and ready to be ironed. You can use your hands too, but a weeding tool is more convenient. Now, you have finally come to the main part of how to make custom shirts with Cricut.
Step 8: Ready Your EasyPress
When your design is ready, you can set your Cricut EasyPress to cotton or linen to get the desired results. So, now you need to put your weeded design on the shirt apparel and use a Cricut EasyPress 2 to heat it. However, before that, you must use a brayer tool to remove lint and fibers from the shirt’s fabric. Once you do that, for the next steps.
Step 9: Preheat Your Shirt
When your apparel is ready, use your EasyPress to preheat it for 15 seconds with moderate pressure to remove the moisture and wrinkling. For the final heating, you should consider a Cricut Heat Guide that will help you find the best setting for your design. After that, use the temperature and pressure accordingly.
Step 10: Apply Heat to Your Shirt
And the last step is to just apply the heat as the Cricut guide suggests. Use a towel to place on your vinyl design, and apply heat for 30 seconds. Using a towel will prevent your iron-on from getting damaged. Viola, you have just designed a perfect custom shirt with your Cricut.
Conclusion
You were all wondering how to make custom shirts with Cricut. And with my blog, you might have found this process a bit easier than before, I guess. Don’t worry; if you follow the instructions carefully, I can bet you can make a fabulous shirt.
However, be mindful of the heating setting as it can ruin your project and waste everything. It’s always better to use a household iron while making your first project. When you get familiar with the process, you can take one step ahead with an EasyPress.
Source Url :- how to make custom shirts with Cricut
Visit here for more Information:- · cricut design space log in
· cricut machine
· cricut machine setup
· how to make custom shirts
· step-by-step guide
· install cricut design space
#how to make custom shirts with Cricut#CRICUT DESIGN SPACE LOG IN#CRICUT MACHINE#CRICUT MACHINE SETUP#STEP-BY-STEP GUIDE#INSTALL CRICUT DESIGN SPACE
0 notes
Text
Arsenal 2024-2025 Home Kit Font – Customize Your Jersey with the Official Champions League Design
The Arsenal 2024/25 Home Kit has arrived, paying homage to the club's rich history. Created by Adidas , it features the Canon crest for the first time since 1989-1990. It also comes with a special Champions League edition , making it a must-have for Gunners

Now, you can bring the Arsenal 2025 look to your home. Our Arsenal 2025 Font Pack lets you customize your jersey with your name or favorite player's number.
👉 Get the Arsenal 2025 Font on Etsy Here
🔥 Kit Design: Modern Edge Meets Classic Spirit
The Arsenal 24-25 home shirt boasts a deep red base with white Adidas logos and dark blue side detailing . The return of the Canon crest adds a touch of nostalgia, blending retro charm with modern style.

This kit is available in authentic and replica versions. Its UEFA Champions League edition adds an extra layer of exclusivity.
⭐UEFA Champions League Edition
This year's Champions League version of the Arsenal jersey keeps the iconic red. It features slight design tweaks and official UCL player fonts . It's perfect for fans who want to bring European magic to their homes.
🏆 What Is the UEFA Champions League?
The UEFA Champions League (UCL) is Europe's top football tournament. It brings together the best clubs from across the continent. Teams must wear official fonts and badges during UCL matches. With this font pack, you can replicate that exact design on your own jersey.
🖨️ How to Use the Arsenal Font on Your Jersey
Our font lets you create personalized names and numbers that look like the pros. It's perfect for Cricut, Adobe, and other platforms. This digital download gives you all the tools you need.
youtube
✅ What's Included:
OTF + TTF font files (for installation)
Vector formats: AI, SVG, EPS (for Cricut, Silhouette, and more)
Editable numbers and letters
Compatible with printing methods like DTF or Heat Transfer Vinyl
🧵 How to Use:
Download the font after purchase
Install it on your computer (double-click OTF/TTF files)
Design your custom jersey using tools like Canva or Cricut
Print your design using DTF paper or HTV
Apply the print to your shirt with a heat press
Wear or gift your personalized football jersey!
💻Top 5 Design Tools to Use with Football Fonts
Canva – Great for beginners and mockups
Cricut Design Space – Ideal for custom cutting
Adobe Illustrator – Best for vector editing
CorelDRAW – Strong alternative for pros
Inkscape – Free and powerful for advanced users
🛍️ Why Buy from Etsy?
Etsy is a trusted place for digital and handmade items. Buying from our official Etsy shop means you're supporting an independent designer who loves football. You get instant, secure downloads in high-quality formats for printing or digital use.
Plus, you're protected by Etsy's buyer protection . This gives you peace of mind with every purchase.
👉 Get the Arsenal 2025 Font on Etsy Now
❓ FAQ – Arsenal Jersey Font
Can I customize with my name or favorite player? Yes! The font is editable, so you can add any name or number.
Can I use this font with Cricut or Silhouette? Absolutely. The pack includes SVG and AI files for vinyl cutting.
Is this an official font? It's a high-quality fan version inspired by the Arsenal 2024/25 UCL kit font .
Can I sell jerseys with this font? It's for personal use only , not for selling printed goods.
What's the best way to print the design? We recommend using DTF (Direct to Film) or Heat Transfer Vinyl for the best results.
#Arsenal#Arsenal 24-25 font#Champions League#Font Football#font#font design#fonts#fonts & typography#football#football jerseys#football numbers#jersey#premier league#ucl#ucl 24/25#uefa champions league#Youtube
4 notes
·
View notes
Text
Cricut Iron On Vinyl Instructions: Quick & Easy Guide
If you’re new to the world of Cricut and want to upgrade your crafting with iron-on vinyl, then this quick and easy tutorial is for you. Cricut iron on vinyl is a thin, flexible pre-cut sheet or roll of vinyl with an adhesive backing that is activated after heat and pressure. You can create beautiful personalized T-shirts, makeup bags, pillowcases, wine bags, and more from iron-on vinyl.
In this guide, I am going to show you detailed Cricut iron-on vinyl instructions to help you explore other possibilities for the Cricut machine. Don’t worry; I have written this tutorial for beginners in mind — I will walk you through the entire process in depth from start to finish. Plus, I will discuss the essential supplies, how to make a design, how to cut iron on vinyl, and so much more. So, let’s get started.
Essential Tools and Materials for Designing a T-shirt
Gathering enough supplies is the most important instruction for making any Cricut iron-on vinyl project.
A Cricut cutting machine
Weeding tool
Cricut Easy Press
Everyday iron-on vinyl
Base material (T-shirt, tote bag, etc)
Cricut cutting mat
Heat Press mat
Cricut Design Space
Cricut Guide
Butcher paper
Step 1: Create or Upload a Design in the Cricut App
The first thing you need to keep in mind for any Cricut iron-on project is a digital design that allows you to cut iron on vinyl. You use the design and apply it to the desired surface.
First, download a design in SVG format from the internet and make sure it is compatible with Cricut Design Space.
Unzip the SVG file, open the Cricut app, and click on New Project.
Also, hit the Upload button on the left sidebar and upload the file to the canvas.
Next, drag and resize the design to fit the surface. I chose a shirt as the surface to demonstrate the Cricut iron on vinyl instructions.
When the design is ready for iron on vinyl, click the Make It option.
Step 2: Select Your Materials
Now is the right moment to choose the materials and configure the settings one by one in the Design Space.
On the prepare screen, toggle the “Mirror” option and press the Continue button.
Click Browse All Material on the next make-screen and search for iron on vinyl. Note: If you have Cricut Explore Air 2, turn the wheel to custom.
Step 3: Cut & Weed Out Iron On Vinyl
As soon as you select iron as the material, it’s time to cut out the design.
First, place the vinyl on the Cricut cutting mat and insert the mat into the machine.
You have to press the flashing Go button to start cutting your design on the vinyl.
Once the machine stops cutting, remove the mat and the negative parts from the design using the weeding tool.
Step 4: Preparation for Applying Heat
Once your design is ready, it is time to learn Cricut iron-on vinyl instructions and prepare everything to apply the heat.
Initially, visit the Cricut Heat Guide and get accurate timing & temperature info.
Set up the workspace, place the Easy Press mat on a clean surface, and preheat it.
Now, lay down the shirt on the heat press mat and preheat it for 5 seconds to remove the wrinkles.
Step 5: Place the Vinyl on Your Shirt
These are the final Cricut iron on vinyl instructions that need to be followed to complete the process.
First, center the vinyl design on the shirt you just cut out, and be sure to place the shiny vinyl side up.
Now, place butcher paper over the design and apply heat to the vinyl following the Cricut heat transfer guide. I use light pressure at 315F for 30 seconds.
Finally, leave the surface (shirt) until it cools, then peel off the plastic transfer sheet.
Frequently Asked Questions
Question 1: How do I use a Cricut iron on vinyl?
The following are brief step-by-step instructions for using the Cricut vinyl.
Create or upload a design in Cricut Design Space.
Select vinyl as the material and other cut settings.
Cut and weed out the design.
Place the heat press on your design.
Question 2: How long should you leave the Cricut iron on vinyl?
Once you apply heat to the Cricut iron on vinyl, it penetrates the surface, and the time and temperature depend entirely on the Cricut Heat Guide instructions. For better results, apply moderate pressure with the iron for 25 to 30 seconds. As for how long to leave the iron on vinyl, the answer is simple: until the surface has cooled.
Question 3: What materials should you avoid while using Cricut iron on vinyl?
Before deciding how to use Cricut iron on vinyl, it is important to know its compatibility with various materials. Iron on vinyl is suitable for use on cotton, polyester, blends, and burlap canvas. But, it is not compatible with fabrics like nylon and spandex. Therefore, refrain from using iron on vinyl on such fabric surfaces.
Final Words
Crafting with a Cricut machine is both adventurous and challenging, offering many opportunities. One such difficult task is cutting and applying heat iron on vinyl with Cricut to create popular DIY projects like T-shirts, tote bags, cards, banners, keychains, and makeup bags. If you are here, you’ve already navigated through the step-by-step Cricut iron-on vinyl instructions necessary to achieve the desired output.
Source: Cricut iron on vinyl
Cricut iron on vinyl instructions
Visit here for more Information: Cricut.com/setup
Cricut explore 3
#Cricut iron on vinyl#Cricut iron on vinyl instructions#cricut.com/setup#cricut explore 3#design space cricut#cricut maker 3 vs explore 3#2024
1 note
·
View note
Text
7 Amazing Cricut Explore Air 2 Projects for Every Crafter
Hey crafters! Have you wondered what kinds of Cricut Explore Air 2 projects are available? Well, I have various Cricut project ideas for beginners, and I want you to try them all this year. Be it a birthday celebration or simple home decor, the Cricut Explore Air 2 will meet all your needs.
Despite these, I have selected 7 of the best project ideas, especially for beginners. I have been working on these projects since December and am ready to reveal those projects to you. Through this blog, you will have several ideas about exciting projects you can make with Explore Air 2. Without further delay, let’s delve into this blog and start creating your desired projects quickly!
1. Leather Earrings
Want to make something on Explore Air 2 using leather? Try these beautiful red-colored flower earrings that look fabulous and eye-catching. The material I used for these earrings is leather. However, I made this to give to my mom on her 56th anniversary. The rosy texture gives it stunning looks that no one can ignore. So, if I can make such a beautiful earring on Cricut Explore Air 2, then why can’t you? Just give it a try and bring a smile to your loved one!
2. Spiders Window Cling
Want to make something ghostly but cute? Here’s the spider hanging on my windows. Don’t worry- that’s not real! I made this using black vinyl. I had super fun making it on my Cricut machine. Also, if you want to add it to your Halloween decoration list, look no further than this amazing window cling. Creating such Cricut Explore Air 2 projects is easy and fun. Just give it a thought this year!
3. Cupcake Toppers
If you want to add toppers to your cupcakes, Explore Air 2 can help you with that! I used golden glitter vinyl in this project and chose a stylish font for my Cricut Design Space to make it appealing. So, elevate your festive or birthday celebration by making such beautiful Cricut projects. Making this topper was super fun, and now it’s your turn to enjoy!
4. Tote Bag
My son Harry asked me to create a gift for his school teacher. I thought, let’s create something useful or easy to make. Hence, the idea of making this tote bag hit my mind, and I gathered all the essential supplies, such as vinyl and Cricut Explore Air 2. So, finally, when my son gifted this to his teacher, she was very impressed! So, try this and use different fonts and quotes to make your teacher smile.
5. Hot Cocoa Mug
A hot cocoa mug was the first thing I made using my Explore cutting machine. The reason why I chose this project is because I had several blank white coffee mugs. Hence, it was the best time to add some creative touch to these items. So, if you are a beginner and want to try something very simple without much effort, try beautifying this cocoa mug.
6. Paper Flower
How about this project? It looks tricky, doesn’t it? Well, it’s not! I recently made this on my trusty Explore Air 2 cutting machine, which handles this project easily in a few minutes. In addition, working on this project was superb, exciting, and fun at the same time. So, gather some colorful cardstock paper and cut the petals into desirable shapes to give the look of a real flower.
7. Valentine’s T-shirt
Just a month later, Valentine’s Day is arriving soon next month! Hence, I hope you will make something memorable for your loved ones. However, I’ve already started making several fascinating Cricut Explore Air 2 projects. Especially, I tried this white T-shirt with L-O-V-E printed on it. I am sure my boyfriend will love this. So, don’t forget to make your lover feel special this Valentine’s Day.
FAQs
Question 1: Can I engrave acrylic on Cricut Explore Air 2?
Answer: No, Explore Air 2 can’t perform an engraving operation. So, technically, it is not possible, but there are some hacks that you can try to engrave on Explore Air 2. In other words, you can try engraving using your Explore, but for this, you will need a skinny font and a cut-and-foil operation.
Question 2: What are Cricut project ideas for beginners?
Answer: Numerous ideas are available for beginners who want to work on beginner-friendly Cricut Explore Air 2 projects. In addition, these projects can be easily made on Explore Air 2.
Advertisement
These project ideas are as follows:
Paper flowers
Earrings
Vinyl T-shirts
Car decals
3D flowers
Banners
Monogram for a coffee mug, tumbler, or cup
Stickers
Leather bracelets
Greeting cards
Wall decals and much more
Question 3: What can I do with Cricut Explore Air 2?
Answer: This Cricut Explore model is a mid-range electric cutting machine specially designed to cut paper, cards, and vinyl. All you need to do is create a design on Cricut Design Space and cut it on Explore without any problem. These machines can cut a wide range of materials, allowing them to create various projects.
Conclusion
I discussed a total of 7 Cricut project ideas in this blog. All these projects are compatible with Cricut Explore Air 2. Also, they do not require anyone to put so much effort into making these amazing Cricut Explore Air 2 projects. From leather earrings to Valentine’s LOVE T-shirts, several ideas exist. In addition, this project is beginner-friendly and easy to make without needing extra accessories or money. So, which one do you find the best? So, whatever it is, you will rock it with the Explore machine.
Source :- https://designaccessoriesmart.wordpress.com/2024/02/03/7-amazing-cricut-explore-air-2-projects-for-every-crafter/
0 notes